How to Use Meeting Manager
How to Use Meeting Manager
Download
Login
Hosting a Call
Joining a Meeting
Pausing and Starting Application Sharing
Changing Application Sharing
Changing Presenter
Give Control
Chatting
Recording
Download
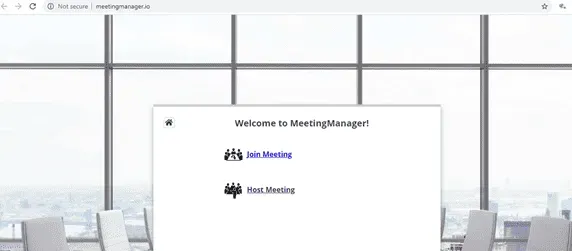
In a web browser, go to your meeting server web address https://meetingmanager.io. Click the Host Meeting link. Download MeetingManager and run it.
- Using MeetingManager 6-in-1 products, you can host four types of meetings. You can choose the type of meeting you want to host.
- This section discusses the steps to host an interactive meeting. This meeting type is the conventional method of web conferencing.
- Each attendee (using either PC or Mac) can interact in the meeting and can be the Presenter or a Controller.
Login
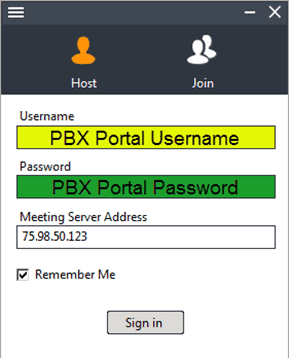
Launch MeetingManager by clicking the MeetingManager shortcut from the desktop or start menu. Login using your Meeting manager username and Password. If the meeting server address is blank, please enter 75.98.50.123 in this field. After login you can see in the MeetingManager Control Panel, the list of scheduled meetings and the following options available:
Host an unscheduled meeting
Schedule a meeting
Join a meeting
Hosting a Call
Click Host to host an impromptu meeting.
- Here you may select the type of meeting you would like to immediately launch.
Interactive Meeting |
It allows you and your attendees to show and control each other's screen. |
HD Video Conference |
It allows you to conduct an HD video conference. |
Webinar |
Attendees don't need to download anything and can view your presentation instantly with a browser on any platform. |
Remote Support |
View and control attendee's computer immediately after the attendee joins this meeting. |
Remote Access to This Computer |
Allow this computer to remotely be unattended controlled. Meeting password is mandatory for this meeting. |

Joining a Meeting
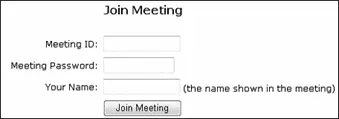
When you receive an invite from the host, open your browser and:
- Go to the meeting's server address
- Click the Join Meeting icon.
- Fill in the Meeting ID, Meeting Password and Your Name.
- Click the Join Meeting button.
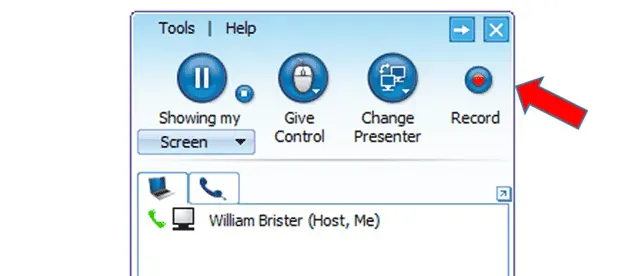
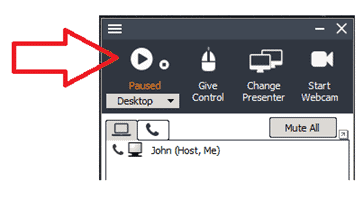
Pausing and Starting Application Sharing
- When you start a meeting, by default, your desktop will be shown to meeting attendees.
- To pause sharing your screen click the Pause button.
- To start showing your screen again, click the Start button.
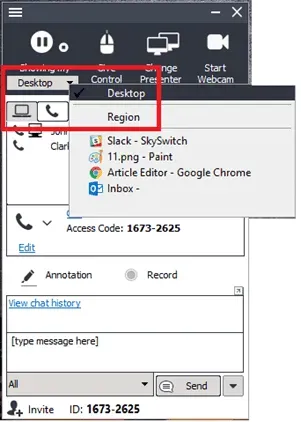
Changing Application Sharing
By default, your desktop is shown to the other attendees. The drop-down list displays all the applications open in your system. To show another application, click the drop-down and choose any running application.
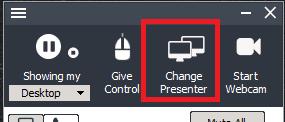
Changing Presenter
The attendees who have joined the interactive meeting can also be the presenter to show his or her computer screen to other meeting participants. By default, the host will be the presenter. However, during a meeting, the host and the current presenter can assign any participant to be the presenter. To change the presenter, click Change Presenter and choose the presenter.
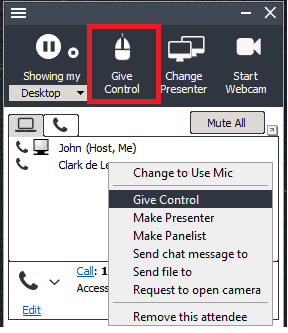
Give Control
- During the meeting, you as the presenter can assign a participant as the controller. The controller is the person who can control your mouse and keyboard.
- To change the controller, click Give Control, then choose the participant you want to assign control to, or click on a name in the list of participants and click Give Control.
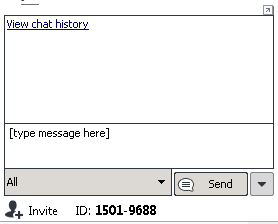
Chatting
While convening a meeting you can also chat with attendees. To chat with the attendees:
- Click Chat.
- In the Chat window, you have the option of choosing the attendees with whom
you want to chat. Click the drop-down arrow and select the attendees. - Type in the text and click Send. To save the chat transcript click Save. Browse
to the location and save the file. The chat is saved as a text file or a rich text file.
Recording
During a meeting, you can record the actions on the presenter's screen. It also records the voice captured by the microphone on the presenter's computer. To record the meeting conversation, you need to turn on your speakerphone and move it close to the microphone in order to capture conversations. Click the record button to start recording and click it again to stop recording. When stopping the recording, the system prompts you to ask where to save the recording file. The file is an executable. Just run the file and it will replay the entire recording session.