Mobile ConnectUC
Content
Installation
Functions and Features
In-Call Features
Conference Calls
Reporting
Additional Resources
Installation
Accessing and Setting up ConnectUC Mobile
ConnectUC Mobile - Google Play Store (Android)
ConnectUC Mobile - Apple App Store (iOS)
Installation Prompts
Open the App
Sign-In
Grant Permissions
Accessing and Setting up ConnectUC Mobile
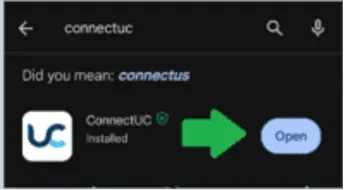
First, search for ConnectUC in your mobile app store.
Alternatively, you may use the App Store links:

ConnectUC Mobile - Google Play Store (Android)

ConnectUC Mobile - Apple App Store (iOS)

Installation Prompts
Click on Install.

Open the App
Once installed click on Open.
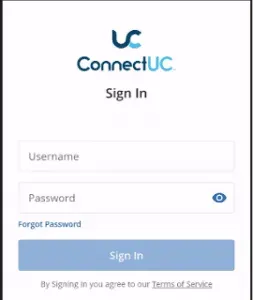
Sign-In
You will then be brought to the following login page. Use your ReachUC/User Portal login credentials. If you do not have login credentials created yet, please reach out to the telephony team via email at [email protected] or 312-564-4888 to assist you with creating login credentials.
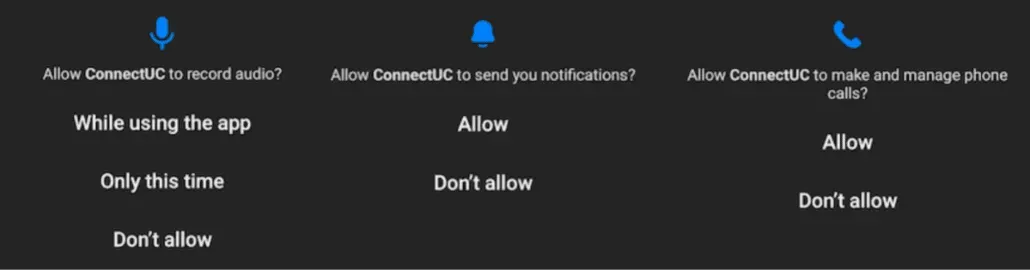
Grant Permissions
Once the application is installed and you have signed in, you will be prompted to allow device permissions and notifications. Please be sure to allow these permissions, as some ConnectUC Mobile features may not work properly otherwise.
Features
Functions and Features
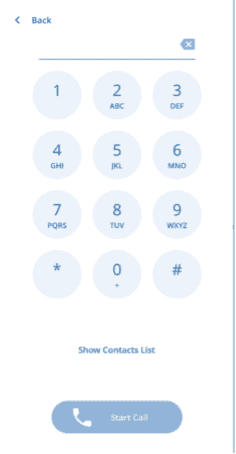
Dialer
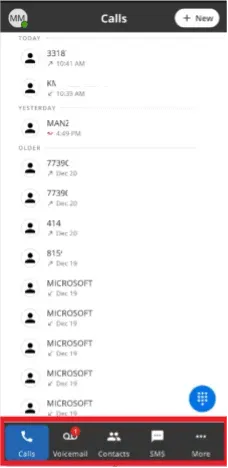
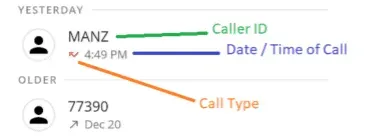
Calls Tab
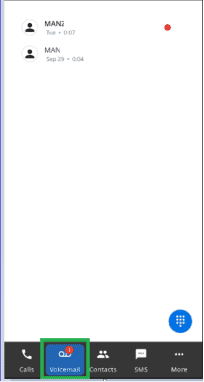
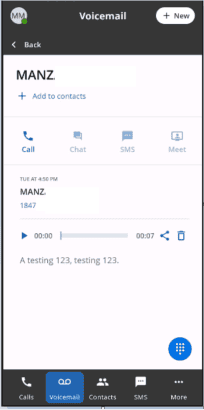
Voicemail
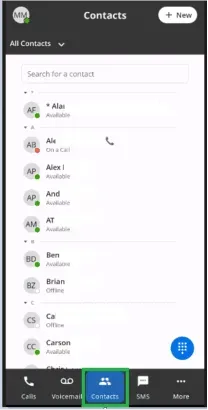
Contacts
SMS/MMS Features (If Enabled)
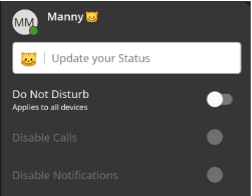
Do Not Disturb/DND
Incoming Calls
Functions and Features

Dialer
The Dialer option found at the bottom right of the screen brings up a dial pad for you to use to make calls. Additionally, you can also search and call existing contacts from the dialer menu > Show Contacts List.
Voicemail
The Voicemail tab allows you to view, listen, share, and read transcripts (if enabled) for voicemails you have received. After clicking on an individual voicemail, you also have the option to call the number back within the app or delete the voicemail.
Contacts
The Contacts tab allows you to view status of company contacts, create, and manage all your ConnectUC contacts.
SMS/MMS Features (If Enabled)
User/extension with a direct dial phone number will be able to text internally with users in their company domain.
To use SMS/texting features with an external phone number a 10DLC Brand and Campaign registration must be completed. A direct dial phone number assigned to the extension/user is needed as well. Please reach out to the Telephony Team to complete the 10DLC registration process and assign a direct phone number.

Do Not Disturb/DND
To enable DND and prevent incoming calls to the ConnectUC app, click on your profile picture on the top right of the app from the main screen.
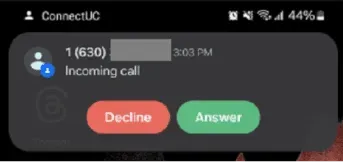
Incoming Calls
Incoming calls to the Connect UC app will appear as the following screen on your mobile device.
In-Call Features
In Call Functions
Mute
Speakerphone
Hold
Dialpad/Keypad
Call Transfer
Recording Calls
Retrieving Recorded Calls
In Call Functions
While on a call you will see the following function icons appear on the screen.
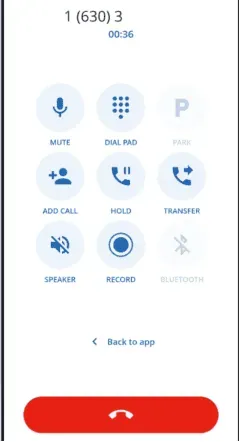
Mute
Clicking on the Mute icon will let you Mute or Unmute your Mic.

Speakerphone
Clicking on the Speaker icon will place the call on or off speakerphone.

Hold
Click on the Hold icon to place the caller on hold. Click Hold again to resume the call.

Dialpad/Keypad
Clicking on the Dial Pad icon will bring up a Keypad to use while on a call. This Keypad will let you enter keys for options. For example, selecting an automated attendant option or following voicemail prompts when checking your voicemail. It is NOT used to make an outgoing call while on a call.

Call Transfer
While on a call click on the Transfer icon to bring up the following options and enter the phone number or extension to transfer the call to.

Recording Calls
Some calls will give you the option to record the conversation. This can be done by clicking on the Record icon. You can pause recording anytime during the call by tapping on the Record icon again.

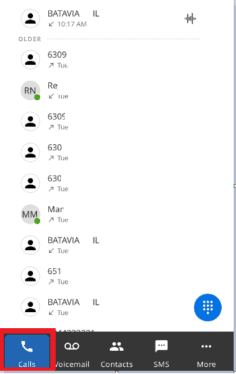
Retrieving Recorded Calls
To access your recorded calls, click on the Calls Tab to pull up your call history. Calls with the Audio Wavelength Icon have recordings that can be retrieved by clicking on it.
Conference Calls
Conference Calls/Merging
In Conference Menu Screen
Conference Calls/Merging
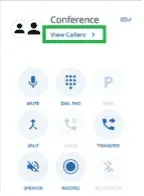
While on a call you will be able to add an additional call to begin a conference by clicking on the Add Call icon.

In Conference Menu Screen
You can also click on View Callers while on a conference call to bring up a separate in conference menu screen.
Additional Features
Additional Resources
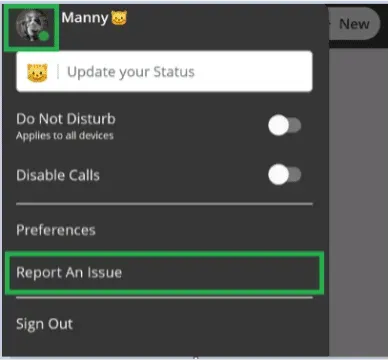
Reporting
Reporting
ConnectUC's Report an Issue feature allows users to report any issues relating to their ConnectUC experience.